Tuesday, November 13, 2012

#100 Easy to Make Natural Christmas Wreaths

 
Create a Stunning Wreath with Fruit and Foliage

This bountiful Christmas wreath is actually two -- a smaller wreath form adorned with apples, Key limes, pinecones, and boxwood fits perfectly inside a larger wreath decorated with limes, lemon leaves, berries, cypress, thistle, and bells of Ireland. To make this festive door decoration, add the elements above to florist's foam circles with pins and hot glue.

 
Use Apples to Create a Medallion Wreath

Green-and-red apples on this unusual Christmas wreath make it pop with color. Cover a 9-inch foam circle with green sheet moss (available at crafts stores), using hot glue to secure the moss.

 
Combine Boxwood and Fruit for a Diamond Christmas Wreath

This festive design shows you how to make Christmas wreaths that look fresh and smell fragrant. Start with pears, berries, eucalyptus, and evergreen boxwood. Insert a 5-inch wooden skewer into the bottom of each pear. Place hot glue on the skewers and push them into a 9-inch square boxwood wreath. Insert sprigs of seeded eucalyptus and faux berries around pears, securing with hot glue.

 
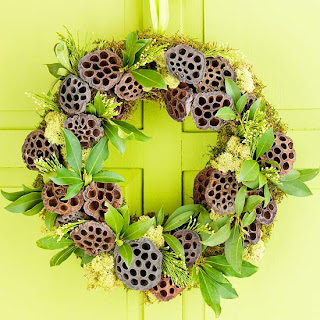
Use Lotus Pods to Add Detail to Christmas Wreaths

Unexpected materials can add texture and inspiration when you're trying to decide how to make Christmas wreaths that are a bit out of the ordinary. Here, dried lotus pods become fun holiday baubles on this natural Christmas wreath. Hot-glue moss to a 9-inch wreath form, covering it completely. Then add lotus pods in a random pattern to the wreath. Finish by adhering fresh or faux leaves and arborvitae sprigs to the moss around the lotus pods.

 
Transform Nuts into a Star Wreath

This nut-studded star wreath will add a punch of holiday cheer to your front door, as well as show holiday guests how to make Christmas wreaths with unusual materials. Wrap an 18-inch wire star wreath form with ribbon and hot-glue in place. Glue mixed nuts to the entire form in a random pattern, then glue fresh bay leaves around the perimeter of the wreath behind the nuts.


Try Fragrant Fruit in a Christmas Wreath

Turn dried oranges and lemons into a circle of refreshing color. For a different visual pop, try a mix of lemons and limes. Garnish with evergreen, ribbon, and baubles for a fancy.


Friday, October 19, 2012

# 99 Create Beautiful Fall Mantel Decorations

 
Burlap and harvest colors make a statement on this mantel. The garland is made by cutting six triangles from a piece of burlap and adhering them to a length of wide ribbon using hot glue. Give a tall vase a makeover with a coat of chalkboard spray paint and a welcoming fall message.

 
The vintage look of this fall mantel can easily be re-created with backyard finds and an easy-to-make garland. The backdrop is a planked stove board, and old minnow buckets filled with dried hydrangeas add symmetry on either side. To make her ruffled felt garland, gather a 1/2 yard of brightly colored felt and cut in half. The felt was 10 inches wide, so she cut each width into four 2-1/2-inch wide strips. Adhere four of the strips together at the ends with hot glue. Measure approximately eleven feet of jute, knotting one end of the twine and threading the other through a large-eye needle. Stitch with wide stitches down the middle of the strip. To give your garland more dimension, make a second garland from the same materials; twist the two strips together and hang from your mantel.


This mantel has a rustic look for fall, using several natural elements. A wooden bowl holds acorns beneath an antique window frame. Faux pumpkins sit atop a stack of paperback books tied together with twine and also on a vintage scale with a piece of scrap burlap. To create her bright fall wreath, use colored yarn, a wreath form, and faux foliage. Secure the yarn with a dab of hot glue on the back of the wreath form and wrapped the yarn carefully around, alternating the colors. Add a few fall foliage embellishments with hot glue and florist's wire and hung the wreath on the window frame.

This mantel combined rustic and vibrant elements,  using a metal-and-wrought-iron frame as a focal point for her design. A vintage wooden pheasant figurine, a red fall sign, and small gourds placed under a glass cloche to give the mantel pops of color. Creamy pumpkins, candles, and burlap-wrapped pitcher add to the design, and a garland made from fall-hue wooden beads strung together on picture wire adds a fun layer. The mantel gains a welcoming glow with light-up branches placed in a pitcher alongside faux florals, natural branches, and feathers.
Instead of the traditional colors of autumn, use muted tones of cream, blue, and green to coordinate with the existing decor her home. Layer natural elements like ruffled burlap, stacked stone, basswood slices, birch bark candles, and rustic pottery, and interspersed them with decorative silver accents, Indian corn, and bundles of wheat. Create the ruffled burlap garland by gathering the edges of 6-inch burlap strips and hot-gluing them end to end.


The abundance of natural materials in the fall make decorating your mantel easy and fun! Head outside and pick up pinecones, dried leaves, and branches. Use these materials to accent an old barn door and a dried hydrangea wreath.


Saturday, October 13, 2012

# 98 Rearrange for WOW

  In living room where lounging and TV-watching are the main activities, a sectional sofa offers flexible, comfortable seating. Sectionals come in a variety of units, from armless chairs to love seats, ottomans, and chaises that you can combine to fit your space


An effective room arrangement starts with the focal point, the cornerstone of your living room design. Typically a fireplace plays this role, but in this contemporary cottage space, the view out the French doors takes center stage instead.
Orient the main seating piece toward the focal point and arrange the secondary seating pieces around the main piece. In winter, the room could be rearranged to focus on the fireplace.

 
Use a large area rug to unify a seating group within a larger space. If the rug isn't large enough to contain all of the seating pieces, make sure that those farthest from the wall are solidly anchored on the "island."

 
Divide a large living/dining space into separate zones with furniture placement. A pair of chairs and a sofa arranged on a rug defines the conversation area from the rest of this open layout
Pairs of matching sofas, side tables, and lamps strike a perfect balance on each side of the fireplace in this contemporary living room. Symmetry imposes a sense of order on the space.

# 97 Refresh, Rearrange

 
If your living room is the setting for large parties, bring intimacy and a comfortable sense of scale to the room by dividing it into two conversational groupings with a path between them. Placing one sofa with its back to this path underscores the separation between the two groups, as do the area rugs anchoring them.

 
If you're more likely to lounge in front of the fireplace than sit on a sofa, keep a supply of oversize floor pillows and ottomans on hand. Ottomans can move where you need them for seating, or they can stand in as side tables.


Placing the furniture diagonally gives a boxy room some flavor. The diagonal also creates a welcoming pathway into the seating group.


Use the sofa and coffee table to establish the diagonal axis and arrange additional seating on the same axis. To subtly anchor the seating group to the room's architecture, align the area rug with the fireplace wall.

Wednesday, September 12, 2012

# 96 This Fall Create Curb Appeal

 
Transform your front walk into a stylish statement by edging it in easy-care plants such as variegated hosta and boxwood.


Many homeowners think of their front yard as one band of land between the sidewalk and the home. But make landscape magic by breaking it up with perpendicular plantings. A curved border, for example, adds a note of grace and elegance.


Plant a variety of evergreens to keep your yard looking classically beautiful through all the seasons. Choose from a wide range of evergreens, including groundcovers, dwarf shrubs, and large trees.

Lacking height or grand proportions, small ranch-style homes can sometimes get lost in the shuffle. Good landscaping gets them noticed. For example, use an ornamental arbor or fence to call attention to the house and mark the entrance.

Tip: White structures stand out even more against colorful flowers and a nonwhite home


Some of the best gardens use layering -- where you combine layers of plants that grow at different heights.

Thursday, August 9, 2012

# 95 Budget WOWS!

 
Painted the same color, mismatched secondhand dining chairs look happy together. Use white for a simple look or embolded your dining room by using paint in a deep, rich color.


Remove the jackets, then group books by color, standing some upright and stacking others. Shelves will seem more organized and have an artistic, color-blocked look.

 
A pair of oversize urns is a foolproof scheme for a mantel. It's easy and a little glam, especially if the urns are a great color.

 
Make an easy table runner for your next get-together with assorted paper napkins. Lay out napkins (we used lunch size, but cocktail size would also work) in desired design, tape the edges together and flip over.


An extra-large mat is a simple trick for giving a small photo or piece of art big presence.

Monday, July 23, 2012

# 94 Fresh Look on Garage Sale Finds

 
A torn shade couldn't detract from the lamp's sculptural base. Even better, the cord wasn't frayed or damaged, which meant only a new bulb was needed to get the fixture glowing again. It was a steal for just. $5. The base was painted with Krylon’s Sun Yellow after it was sanded and primed. The lampshade had to be tossed. A 5/8-inch grosgrain ribbon was glued along the bottom and top seam of the new shade.


While the $6 frame was missing its back and glass, it had a timeless beveled profile. We turned it into a tray with thick cardboard, wrapping paper, spray mount, drawer handles and satin latex paint.  The frame was painted with the color Peppery by Sherwin-Williams. Medium-thick cardboard was cut the same size as the glass and covered in Arboreal Villa Goldenrod wrapping paper.


The dresser's elegant woodwork caught our eye; its mahogany frame and working drawers earned it a spot in their pile of loot. It was picked up for $40 and given a fresh look with water-based primer and then finished with satin Photo

Shrink Photo

 paint. The dresser frame was given a good sanding until it was smooth and the shine from the varnish was dull. It was primed and painted with three coats of Blond Wood by Benjamin Moore. The hardware was replaced with porcelain knobs.